Make a Shape! Where Geometry Meets Place Value in First & Second Grade

Rusty Bresser
Have you ever encountered a math activity that is so rich that it addresses multiple topics, spans grade levels, can be used as an assessment, naturally differentiates, and engages children like nobody’s business? Meet Make a Shape (About Teaching Mathematics, M. Burns 1992), an activity that does all the above and more.
Ever since I explored the game Close to Fifty! (see our blog post here) with first graders in Vista, California, I’ve been looking for a companion activity that addresses place value. With Make a Shape, I think I’ve found it.
Recently, my friend and colleague Sharon Fargason joined me in visiting my friend Lila’s 2/3 grade combination class. I’ve worked with Lila many times, and if you’ve read our blog posts Foot Parade! and From Rockets to Polygons, you’re already familiar with her classrooms.
 Using a Visual Image to Get Students Thinking
Lila used one of the visual images from Math Transformations’ Visual Image Bank to get her second graders ready for Make a Shape. While her third graders wouldn’t be experiencing Make a Shape, the visual image she shared was perfect for them as well.
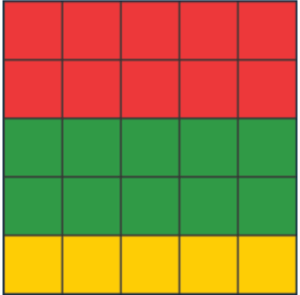
Lila showed the following image from the slide deck and asked her students to first think, then talk with a partner about what they noticed.
When they shared out, I jotted down what students had to say and the questions Lila asked. This image prompted a lot of observations and math thinking.
“I notice different colors.”
“I see squares.”
“I see groups of five.”
“I see groups of ten.”
“How many groups of ten do you see?” Lila asked.
“Four groups, that makes forty.”
“I think there’s forty-five altogether.”
“How do you know?” Lila asked.
“I counted by tens and then one group of five.”
“How else could you figure out how many?”
“It’s a five-by-five square and five times five is twenty-five.”
“It’s kind of like an array.”
“It looks like a big square.”
“The little squares are touching.”
Modeling the Activity with Second Graders
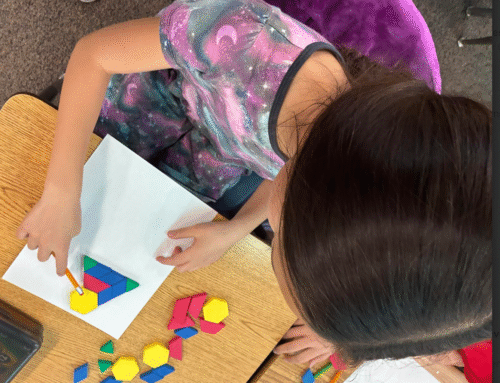
 While Lila worked with her third graders, Sharon and I met the second graders on a rug in the corner of the room. To start things off, I took a white piece of paper, some color tiles, and a pencil and jumped right into modeling the activity. I find that if I talk too much at the beginning of a lesson, students tend to lose interest. I wanted them to see what they’d soon be doing right away (see full lesson directions here).
“I want to make a shape on this piece of paper so that 21 color tiles will cover the area of the shape,” I explained. “I’m going to estimate how big the shape should be, then I’ll draw it.” As students watched, I modeled the activity using the following steps.
- I drew a shape (thinking aloud that it’s best to use straight lines, not curved ones).
- Then I had the students count aloud with me as I placed ten green tiles inside the shape’s area (see image below), so that the tiles touched one another, making a continuous patch of green.
- Next, I switched to blue and placed five more tiles until the shape was completely covered.
- I asked the students how many total tiles covered the shape’s area and asked them to explain how they figured the total (some counted by ones, others started with 10 and added on 5). I wrote the number 15 on the paper next to the shape.
- Finally, I asked the second graders how far away 15 is from 21 (some counted on by ones from 15 while others added 5 then one more to get on 21).
Second Graders Make Their Own Shapes
After modeling the activity, I challenged the students to make a shape that covered an area of 32 tiles. I emphasized that once their shape is drawn, they need to cover the area with 10 tiles of one color, then 10 tiles of a different color, and so on. We passed out paper, lapboards, and pencils, and made color tiles available. Students got right to work.
For most, drawing the shapes on their papers was not a challenge (see photo below), although their first tries were a little off the mark, covering their shapes with either more or less than 32 tiles.

One student covered her shape with 35 tiles. When I asked her how far 35 was from 32, she instantly knew the difference was 3. Although this question wasn’t difficult for her since the numbers were close together, this type of subtraction problem (the distance between two numbers) is often challenging for students.

After their first try, I let students choose their own target number. This girl (see above) chose 40 tiles as the target number to cover the area of her shape, and she hit her target perfectly!
Lila’s second graders were so engaged and motivated that they kept on making more shapes, each time choosing a different target number. With practice, their estimates improved as well as their ability to figure out the difference between their target numbers and the actual results.
Choice and Autonomy = Agency
 As students made their shapes, we noticed that when we allowed them to decide on their own target numbers, it positively affected their motivation and engagement. As well, when students wanted to veer from our directions a bit, the result was surprising.. For example, this student (see below) was determined to only use blue tiles (his favorite color). After several attempts to get him to place 10 tiles of one color and then a different color for the next group of 10, I gave up and just let him work with blue tiles.
When he was finished covering his shape, I asked him how many tiles he had used. My worries vanished when he started counting rows of 10 tiles and landed on the correct answer. He was able to ‘see’ the groups of 10 without the help of the different colored tiles.
Autonomy is the inherent capacity for independent choice, while agency is the ability to act on those choices and achieve goals and outcomes on your own. These second graders certainly brought to life these definitions! The experience reminded me of the power of letting go of my impulse to control events in the classroom, and allow students space to explore and take ownership of their learning.
Summarizing the Lesson
 There are a few different ways to summarize Make a Shape. One is to gather the students together and write the number 43 on the board and say, “This is how many tiles I had inside my shape.” Then ask, “How many groups of 10 were there? How many extra tiles? How do you know?” This is an important question because it prompts students to visualize the quantities in a 2-digit number. What’s the place value of the 4 in 43? At its face value, it’s a 4, but its place value is something very different. We want children to be able to visualize the value of the digits in a number, whether they see in their mind’s eye groups of ten color tiles, base-ten blocks, or towers of snap cubes.
Another way to summarize might be to use student samples to pose a problem. For example, I might have taken a picture of this student’s final product (see below) and pose the question: “Her target number was 46 and she covered her shape with 65 tiles. How far away from her target number was she?”
Rich Tasks Give You a Big Bang for Your Buck
Teachers are good citizens, and we sometimes feel as though we must ‘cover the curriculum’ by teaching every single lesson in the textbook. But we don’t have to. Instead, we can teach fewer lessons from the book and replace some with rich tasks, addressing the standards we need to teach and increasing student engagement.
Rich lessons like Make a Shape can be used to teach many topics and skills all at once. For example, Make a Shape engages first and second graders in thinking about area measurement and learning about place value and base-ten concepts as they contemplate the value of the digits in a number. The activity also gives students the opportunity to explore geometry, estimation, and subtraction situations, and can be used as a whole class or small group lesson, or as a task at a learning center. Make a Shape really does give you a big bang for your buck! We hope that you try it out.